STEP 5 Laying It All Out
We're on the home stretch. In a matter of minutes you will
have a working Winamp 3 skin. In this last step of the process
we will be creating the player-normal.xml file. This file
determines the layout of the actual skin and the tags in
this file refer back to the player-elements.xml file.
It's at this point that I normally have both of these
files open next to each other so I can copy and paste the
appropiate "bitmap id" into the area that it is called for.
This is where it all really comes together. The end of
the linking series.
Open up that text editor again and lets finish this thing.
The first thing you have to do in this file is identify
the layout and give it a background.
So this is your first tag.
[layout id="normal" background="main.bg"]
The layout portion of this tag identifies the layout as normal.
And so, you are working within the Main container as defined
in the player.xml So this would be the normal layout of the
main container. This portion of the tag also is used in scripting.
It is all one big chain.
You will notice the second half of this tag is our background.
And that it is the id part that is used to call your background
graphic into action. By now this should all be making sense.
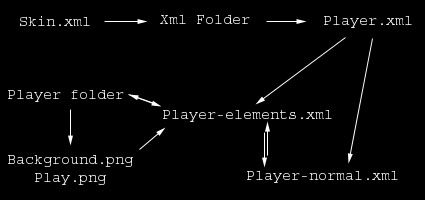
But lets review what will be our final heirarchy scheme.
 Right Now you should add the closing tag to this file.
[/layout]
Now you have a player. But don't go firing up Winamp yet.
we need to put that play button in there.
So lets code that play button.
[button
id="Play"
action="PLAY"
x="10" y="10"
image="play"
downImage="play"
tooltip="Play"
/]
All of the system buttons have there own id and action.
This refers back to the system script. Do not change the id's
and actions of system buttons because they would'nt work.
The next part of this little snippet of code is the x y coordinates.
This is very basic math.
X is the distance from the left side of your graphic,
Y is the distance from the top of your graphic.
The distance is determined in pixels.
So X="10" Y="10" places the upper left hand corner of your play button
10 pixels from the left and 10 pixels from the top.
X="0" Y="0" would place your button dead in the upper left hand
corner of your background. It is even possibly to move the button
right off the skin. If your skin is 275 pixels wide like mine,
and I say x="300". You won't be able to see the button and you
won't be able to use it either.
You will notice in the code above that 2 images are called into action.
But I have used the same bitmap id on both. Image and downImage are
to 2 states of the control buttons. Toggle buttons have an added state.
That is something to remember when you are creating your graphics.
Tooltip="play"
Self-explanatory
O.K. we are done with the player-normal.xml Save it as player-normal.xml
in your xml folder.
Your final code should look like this.
[layout id="normal" background="main.bg"]
[button
id="Play"
action="PLAY"
x="10" y="10"
image="play"
downImage="play"
tooltip="Play"
/]
[/layout]
Well, Your just about done. Follow the checklist on the next page
and double check your code and your skin is done.
next page ->
Right Now you should add the closing tag to this file.
[/layout]
Now you have a player. But don't go firing up Winamp yet.
we need to put that play button in there.
So lets code that play button.
[button
id="Play"
action="PLAY"
x="10" y="10"
image="play"
downImage="play"
tooltip="Play"
/]
All of the system buttons have there own id and action.
This refers back to the system script. Do not change the id's
and actions of system buttons because they would'nt work.
The next part of this little snippet of code is the x y coordinates.
This is very basic math.
X is the distance from the left side of your graphic,
Y is the distance from the top of your graphic.
The distance is determined in pixels.
So X="10" Y="10" places the upper left hand corner of your play button
10 pixels from the left and 10 pixels from the top.
X="0" Y="0" would place your button dead in the upper left hand
corner of your background. It is even possibly to move the button
right off the skin. If your skin is 275 pixels wide like mine,
and I say x="300". You won't be able to see the button and you
won't be able to use it either.
You will notice in the code above that 2 images are called into action.
But I have used the same bitmap id on both. Image and downImage are
to 2 states of the control buttons. Toggle buttons have an added state.
That is something to remember when you are creating your graphics.
Tooltip="play"
Self-explanatory
O.K. we are done with the player-normal.xml Save it as player-normal.xml
in your xml folder.
Your final code should look like this.
[layout id="normal" background="main.bg"]
[button
id="Play"
action="PLAY"
x="10" y="10"
image="play"
downImage="play"
tooltip="Play"
/]
[/layout]
Well, Your just about done. Follow the checklist on the next page
and double check your code and your skin is done.
next page ->
|